Sunday, November 22, 2009

Holiday Hors d'oeuvre: Harvest Sweet Potato Pecan Pie Tarts

I promised myself I would post these before the holidays. If you are looking for something for your guests to nibble on before Thanksgiving dinner is ready – these are it! They are also a perfect hors d’oeuvre for any fall or winter gathering, especially for a holiday party. I think it was my sister who first introduced our family to this recipe several years ago, and it quickly became a permanent fixture for our family holiday gatherings.

The recipe calls for cooked sweet potato. I like to roast mine in the oven. Not only does roasting the sweet potato caramelize it, but it also sends a nice aroma throughout your house. (Prick the sweet potatoes with a knife in several places and bake at 400°F in a small baking pan until very tender, about 1 to 1 ½ hours.) If you’re pressed for time, you could always cook it in the microwave. (Pierce each sweet potato a few times with a fork, place in a pie plate with two tablespoons of water, cover loosely with wax paper, and microwave on high for 5 minutes or until tender.) They are so good!

Harvest Sweet Potato Pecan Pie Tarts
(From Cooking Light, November, 2005)
Ingredients
1 cup mashed cooked sweet potato
3 tablespoons granulated sugar
1/4 teaspoon ground cinnamon
1/8 teaspoon salt
1/3 cup chopped toasted pecans
1/4 cup firmly packed brown sugar
1 tablespoon dark corn syrup
1/2 teaspoon vanilla extract
1 egg white
2 (2.1-ounce) packages mini phyllo shells (such as Athens)

Directions
Preheat oven to 350°F.

Combine sweet potato, granulated sugar, cinnamon, and salt, stirring well.

Combine pecans, brown sugar, syrup, vanilla, and egg white, stirring well.

Spoon about 1 teaspoon sweet potato mixture into each phyllo shell, spreading to edges. Spoon about 1/2 teaspoon pecan mixture over sweet potato mixture. Place filled shells on an ungreased baking sheet. Bake at 350°F for 20 minutes. Cool completely on a wire rack.


Friday, November 20, 2009

Figs Part II: Grilled Figs with Greek Yogurt

Yogurt is a food that has it’s health benefits, but a food that I never felt a strong connection to. I would purchase the non-fat, low-calorie yogurts from the grocery store. The consistency always seemed so runny. The flavors available are endless these days, but taste like an imitation.

Last summer I finally found the other side of yogurt: Greek yogurt. And I found my yogurt match. Greek yogurt is thick, creamy, and sour. It is fatty too, but you can also buy low-fat and non-fat Greek yogurts. It is strained in a cloth bag or filter to remove whey, giving it a thick consistency and preserving its sour taste. My friend Beth recently honeymooned in Greece and she was able to validate that the kind we buy at the grocery store here is the same kind that they sell in Greece!

My favorite way to eat Greek yogurt is plain with a little drizzle of honey. At my grocery store they sell Fage yogurt with a little honey compartment. Perfect for a packed lunch! My husband is partial to their yogurt with the strawberry compartment. I’ve also eaten it with fresh fruit, nuts, and even chocolate chips. I’ll substitute Greek yogurt for sour cream in recipes when I can.

When I recently brought back fresh figs from California, I was excited to pair them with some Greek yogurt and honey. We’ve had a mild fall here, and were able to heat up our outdoor grill for potentially the last time this season. This was a fun treat, and another way to savor our fig souvenir.

Grilled Figs with Greek Yogurt
Ingredients
8-12 fresh figs, sliced in half
2 tbsp honey, plus more for drizzling
1 cup low-fat Greek yogurt
¼ cup pistachios, shelled

Directions
Heat grill on high heat. Brush cut side of figs with honey. Place figs on grill, cut side down. Grill for approximately 3 minutes, until figs have grill marks. Remove from heat.

On 4 dessert plates, place on each plate: ¼ Greek yogurt, several figs, a couple tablespoons of pistachios, and drizzle with honey. Serve immediately.


Thursday, November 19, 2009

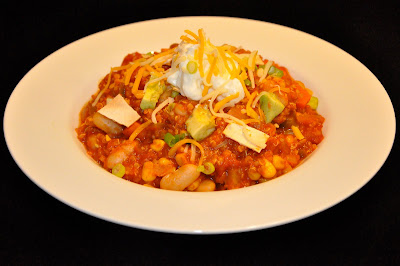
Best Chili Ever: Quinoa Chili

Are you sick of quinoa yet? Because I am certainly not! I keep trying out new recipes of this wonder-grain, and I can’t seem to get enough of it. Just the other week my friend, Beth, forwarded me a recipe for Quinoa Chili. I was rather anxious to try it, because I’ve eaten at Beth’s place before, and I know that she is an excellent cook. At a mid-summer dinner that she and her husband hosted me and my husband for, she prepared our entire scrumptious meal from scratch, including the corn tortillas!

The Quinoa Chili goes together easily, and it is delicious! This is the best vegetarian version of chili that I have ever had. It is hearty yet healthy, and I am so thankful that Beth sent this one my way! You can gave fun with the garnishes, and add whatever you like.


Quinoa Chili

Ingredients
1 Tbsp olive oil
1 medium onion, chopped
3 carrots, chopped
3 stalks celery, chopped
1 teaspoon salt
2 cloves garlic, minced
1 large green pepper, diced
2 teaspoon cumin
1-2 teaspoon chili powder
1 teaspoon dried oregano
1/4 teaspoon cinnamon
1/8 teaspoon cayenne
2/3 cup quinoa, rinsed in warm water and drained
1 cup fresh or frozen corn
2 (14 oz.) cans tomato sauce
1 (14 oz.) can small diced tomatoes
1 cup vegetable broth or water
1 (14 oz.) can kidney beans, rinsed and drained (I sometimes substitute with black beans)

Directions
Heat oil in a Dutch oven or large skillet on medium heat. Add onion, carrots, celery, salt, garlic, green pepper and spices; sauté 5 to 10 minutes. Add rinsed uncooked quinoa and stir in. Add corn, tomatoes, tomato sauce and vegetable broth/water to onion and quinoa mixture. Cover and simmer together 20 minutes. Add kidney beans; simmer another 10 minutes.

If chili is too thick, just add water or more vegetable broth until it is to your liking.

Toppings: shredded cheese, sour cream, avocado, corn chips, green onions.


Monday, November 16, 2009

Celebration in Oaktown: Quinoa, Wild Shrimp & Roasted Beet Salad with Orange Vinaigrette

During our recent trip out to the Bay, we were graciously welcomed by our friends, Amy and Chris. We spent a few days with them in Oakland, along with a fun-filled excursion to Napa. The four of us decided to venture to an area of wine country that was previously unexplored to us all – northern Napa county. We did the drive north past Napa and Oakville, and found ourselves driving through the rolling hills of northern Napa county and quaint towns of St. Helena and Calistoga. St. Helena had buildings with Victorian charm, while Calistoga reminded us of the wild west. The first stop on our wine tour took us to Chateau Montelena Winery, where we marveled at the stone castle, as well as their orange and lemon trees (the wines were good too, particularly their Riesling).


We next ventured to Sterling Vineyards, where a aerial tram takes visitors up to the winery and tasting rooms at the top of the hill.


Our last stop was Cuvaison Estate, where we had a sample of a special Cab, and the sommelier tried to show my husband a thing or two with our camera. After a wonderful meal at Tra Vigne, Chris and Amy gave us a lift to the airport, and we barely made our red-eye flight back home.


Earlier that week, Amy had been scheduled to take a graduate exam that she had long been studying for. While she was off at her exam, I went into San Francisco in search of the Painted Ladies. After an uncalculated walk through the Tenderloin, I finally found the famous row houses and had enough time to snap some pictures before heading back to Oakland to meet Amy.


She had aced the exam and a celebration was in order. Amy, Chris, and I went to a celebratory lunch at Bocanova in Jack London Square. After debating over several options on the menu, Amy and I both ordered the Quinoa, Wild Shrimp & Roasted Beet Salad with Orange Vinaigrette. It was delicious - so refreshing, light, and flavorful! As a fellow cook and foodie, Amy and I spent most of the meal trying to determine how it was prepared.


With the sun shining and a pleasant breeze blowing, Amy and I continued the celebration with a little wine tasting. And on this day, we did not have to hop in a car and drive north of the city to get to wine country. We instead only had to walk a few blocks to get to a couple of Oakland’s wineries. The tasting rooms of JC Cellars and Dashe Cellars are both in Oakland, and share the same location. You can taste flights of wine from each winery for $5, respectively (much cheaper than wineries in wine country!). Amy and I spent the afternoon sampling wines from JC and Dashe, and it was the perfect afternoon to follow up our delectable lunch.


I couldn’t get that quinoa out of my mind, and once I returned home and had a chance to spend time in the kitchen, I made an attempt to recreate our lunch (less the wine tasting). I was pleased that my version was pretty comparable to the dish that we had! I was only able to find a purple beet at my grocery store, but I recommend using a golden beet if you can find it. (The purple beet will color the whole dish, and if you are using one, I recommend adding it at the last minute to try to avoid coloring the rest of the ingredients purple.) You can omit the shrimp for a vegetarian version. Amy and I were contemplating adding some crumbled feta, which I did try, but found it to be too much. This is good as it is, and a lunch that I’ll forever remember!

Kate's Quinoa, Wild Shrimp & Roasted Beet Salad with Orange Vinaigrette
Ingredients
½ cup extra virgin olive oil
¼ cup freshly squeezed orange juice
1 tbsp. Dijon mustard
1 tbsp champagne vinegar
1 medium-size golden beet
1 cup quinoa, rinsed and drained
2 cups vegetable broth
1 cup carrots, shredded
10 oz. cooked shrimp, peeled and deveined
1 orange, segmented
½ cup cilantro, chopped
Kosher salt and freshly ground black pepper, to taste
4 tbsp. watercress or microgreens, for garnish

Directions
Wisk together olive oil, orange juice, mustard, champagne vinegar, and a dash of salt and pepper. Cover and refrigerate.

Preheat oven to 400 °F. Cut off beet greens, wash beets, and gently scrub to remove any dirt. Wrap beet in aluminum foil and place in the middle rack of the oven. Bake until beet is thoroughly cooked (approximately 1 hour). Unwrap beet and allow to cool. Using a paper towel, rub off the beet’s skin. Cut beet into small cubes.

Place quinoa and vegetable broth in a 1 ½ quart saucepan and bring to a boil. Reduce to simmer, cover and cook until all broth is absorbed (10-15 minutes). Allow quinoa to cool.

In a large bowl, combine quinoa, shrimp, orange segments, carrots, cilantro, beets, and salt and pepper. Toss with vinaigrette mixture until lightly coated (you may not use all of the vinaigrette). Top with watercress or microgreens to garnish and serve.


Sunday, November 15, 2009

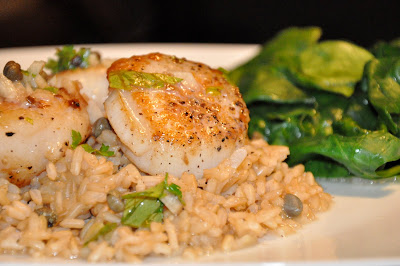
Gourmet at Home: Scallop Piccata with Sautéed Spinach

What a weekend! After a long and grueling week at work, my husband and I met some dear friends for dinner on Friday night, and met their sweet little baby girl. She is a perfect little baby and slept through the whole meal! I was able to keep my own eyes open long enough to give her some hugs and kisses. It was such an uplifting end to a dismal week. On Saturday we moved my widowed, elderly mother-in-law out of her house and into an apartment. By the time my husband and I arrived home we had eaten some take-out pizza and barely finished a beer and glass of wine, respectively, before we crashed on the couch.

Today I was able to get in a few errands, a nap on the couch, and I still put together a dinner that I had been wanting to make for several weeks. I had a bag of scallops in my freezer, brown rice in my pantry, and was just waiting for the right time to try a new recipe I had seen in a recent edition of Cooking Light. I was able to test it tonight, and notwithstanding out preoccupied weekend, we were able to relish a gourmet meal at home to cap off the expeditious weekend.

This recipe makes a full meal (protein, vegetable, starch), and you can cook it all in one pan. It calls for vermicelli or brown rice as a side dish, and I opted to use a bag of precooked brown rice that I purchased at Trader Joe's, and is ready after 60 seconds in the microwave. The Vermouth is very pronounced in the sauce, with a hint of lemon. This dinner is quite healthy (particularly if you’re using brown rice instead of pasta). The trick to getting a good sear on your scallops is to dry them off first with a paper towel, have a very hot pan, and to leave them and walk away (fiddling with them in the pan is going to ruin your sear). I repeat: leave them and walk away for 2 minutes!!

While we were eating this for dinner, my husband and I were saying that it seemed like a meal we’d not only order in a restaurant, but one that we’d be talking about for the rest of the night, and that we’d go back to that restaurant for again and again. Lucky for us we only need one pan and a Sunday night to enjoy it again and again.

Scallop Piccata with Sautéed Spinach
(From Cooking Light, November 2009)

Serve on a bed of angel hair pasta, linguine, or brown rice, if desired.

Ingredients
* 1 1/2 pounds sea scallops (about 12)
* 1/4 teaspoon salt
* 1/4 teaspoon freshly ground black pepper
* 5 teaspoons canola oil, divided
* 1 garlic clove, chopped
* 1/2 cup vermouth
* 3 tablespoons chopped fresh parsley
* 2 tablespoons fresh lemon juice
* 2 tablespoons butter
* 4 teaspoons capers
* 1 (10-ounce) package fresh baby spinach

Directions
Heat a large cast-iron skillet over high heat. Pat scallops dry with paper towels. Sprinkle salt and freshly ground pepper over scallops. Add 1 tablespoon canola oil to pan; swirl to coat. Add scallops; cook 2 minutes on each side or until browned and done. Remove from pan; keep warm.

Reduce heat to medium. Add chopped garlic to pan; cook 10 seconds. Add vermouth, scraping pan to loosen browned bits; cook 2 minutes or until liquid is reduced by half. Remove from heat. Add parsley, fresh lemon juice, butter, and capers, stirring until butter melts. Pour sauce in a bowl.

Heat remaining 2 teaspoons oil in pan over medium-high heat. Add spinach; sauté 30 seconds or until spinach almost wilts. Drizzle sauce over scallops; serve with spinach.


Friday, November 13, 2009

Sisterly Suggestion: Roasted Chicken with Balsamic Vinaigrette

I went through a phase a couple years ago where I watched every episode of Everyday Italian. It became a ritual every night after work while my husband was in class (thank goodness for TiVo). You may have noticed that I am a fan of Giada de Laurentiis’ recipes. (She can do no wrong in my book.) One recipe that I saw her make but never tried was her Roasted Chicken with Balsamic Vinaigrette. It looked like a great idea, but what would I do with a whole chicken? Especially when my husband is a breast man. (That is, boneless, skinless chicken breasts.)

Just a couple of weeks ago my sister mentioned to me that she made this recipe with chicken breasts, instead of a whole chicken. As she was raving about how good it was I was thinking to myself, “…why didn’t I think of that?” So I tried it myself with four chicken breasts, and this was easy and tasty (so says my husband). I paired it with herbed polenta, and he has been dining on this all week!

Roasted Chicken with Balsamic Vinaigrette

(From Everyday Italian)
Ingredients
* 1/4 cup balsamic vinegar
* 2 tablespoons Dijon mustard
* 2 tablespoons fresh lemon juice
* 2 garlic cloves, chopped
* 2 tablespoons olive oil
* Salt and freshly ground black pepper
* 1 (4-pound) whole chicken, cut into pieces (giblets, neck and backbone reserved for another use) (*Kate used 4 boneless skinless chicken breasts - please see baking note below)
* 1/2 cup low-salt chicken broth
* 1 teaspoon lemon zest
* 1 tablespoon chopped fresh parsley leaves

Directions
Whisk the vinegar, mustard, lemon juice, garlic, olive oil, salt, and pepper in small bowl to blend. Combine the vinaigrette and chicken pieces in a large resealable plastic bag; seal the bag and toss to coat. Refrigerate, turning the chicken pieces occasionally, for at least 2 hours and up to 1 day.

Preheat the oven to 400°F*. Remove chicken from the bag and arrange the chicken pieces on a large greased baking dish. Roast until the chicken is just cooked through, about 1 hour*. If your chicken browns too quickly, cover it with foil for the remaining cooking time. Transfer the chicken to a serving platter. Place the baking dish on a burner over medium-low heat. Whisk the chicken broth into the pan drippings, scraping up any browned bits on the bottom of the baking sheet with a wooden spoon and mixing them into the broth and pan drippings. Drizzle the pan drippings over the chicken. Sprinkle the lemon zest and parsley over the chicken, and serve.

*Note - If you're baking chicken breasts, I recommend baking at 350°F for approximately 40-45 minutes.


Thursday, November 12, 2009

Living off of Leftovers: Herbed Polenta

Thank goodness I cook (a lot) on the weekends! I was going to post tonight about a recipe I replicated from a meal I had in San Francisco, but as I was emptying my dishwasher when I came home from work this evening, I noticed that everything I was putting away was either tupperware or plastic-ware. (Okay, there were some wine glasses in there too.) I reflected on our week so far, and neither my husband nor I have eaten one meal at home. Each meal that we’ve respectively had has been homemade food, but they were eaten at a desk, from behind a computer screen, in the car, or on the way to a classroom. I’m so thankful that I took the time to cook up a storm on Sunday afternoon and evening, even though it resulted in us missing a previously scheduled get together with friends. We’re busy, but we’re eating well!

For my husband, I made a lot of chicken, including some balsamic marinated chicken (recipe to come). I made herbed polenta to pair with it as an accompaniment. I am a big fan of polenta, in all of its forms (soft, fried, grilled). Polenta is made with ground cornmeal, and is similar to grits. Soft polenta (like this recipe with fresh herbs) makes a nice alternative to serving mashed potatoes. If you want to speed up the cooking process, you can actually use instant polenta, cook according to the instructions on the box, and add the fresh herbs and cheese.


Herbed Polenta

(As seen on Everyday Italian)
Ingredients
* 6 cups water
* 2 teaspoons salt
* 1 3/4 cups yellow cornmeal
* 3/4 cup grated Parmesan
* 3/4 cup whole milk
* 6 tablespoons (3/4 stick) unsalted butter
* 3 tablespoons chopped fresh Italian parsley leaves
* 2 teaspoons finely chopped fresh rosemary leaves
* 2 teaspoons chopped fresh thyme leaves
* 1/2 teaspoon freshly ground black pepper

Directions
Bring the water to a boil in a heavy large saucepan. Add 2 teaspoons of salt. Gradually whisk in the cornmeal. Reduce the heat to low and cook until the mixture thickens and the cornmeal is tender, stirring often, about 15 minutes. Remove from the heat. Add the cheese, milk, butter, parsley, rosemary, thyme, and pepper, and stir until the butter and cheese melt. Transfer the polenta to a bowl and serve.