Showing posts with label Honey. Show all posts

Friday, March 12, 2010

Supper Salad: Roasted Sweet Potato and Orange Salad

This salad combines so many flavors that I love, and includes ingredients that provide a lot of nutrients. The recipe makes a lot, too! My husband and I have been eating this one all week. (I have all of the pieces refrigerated separately and toss together individual servings for us each night.)

If you're looking for a filling, yet light, entrée salad, this one will do the trick (perfect for a warm summer night!). I roasted the onions along with the sweet potatoes, and recommend doing the same if you can't handle a lot of raw onions. Roasting brings out the sweetness of the onions and also flavors them with rosemary and garlic.

Roasted Sweet Potato and Orange Salad
(From Cooking Light, December, 2005)
Ingredients
Salad:
1 tablespoon chopped fresh rosemary
2 teaspoons olive oil
3 garlic cloves, unpeeled and crushed
1 1/2 pounds peeled sweet potato, cut into 3/4-inch pieces
3 cups orange sections (about 6 oranges)
1/2 cup vertically sliced red onion
3 tablespoons pine nuts, toasted
1 (6-ounce) bag prewashed baby spinach

Dressing:
3 tablespoons fresh orange juice
2 tablespoons olive oil
1 tablespoon stone-ground mustard
1 tablespoon rice vinegar
1 tablespoon honey
1/4 teaspoon salt
1/4 teaspoon freshly ground black pepper
1 garlic clove, minced

Preparation
Preheat oven to 400°F.

To prepare salad, combine first 4 ingredients (Kate also roasted the onions), tossing well. Place potato mixture on a jelly-roll pan lined with parchment paper. Bake at 400°F for 40 minutes, stirring occasionally. Remove from oven; cool. Discard garlic. Combine potato mixture, orange sections, onion, pine nuts, and spinach in a large bowl.

To prepare dressing, combine orange juice and remaining ingredients in a small bowl, stirring well with a whisk. Drizzle dressing over salad; toss gently to coat.


Friday, February 19, 2010

Pom Figs: Dried Fig and Blue Cheese Salad with Pomegranate Vinaigrette

The final piece to our Valentine’s dinner is a new salad that I tried. I wanted to make a salad with some dried figs, and after a bit of searching online, I found this one that also uses blue cheese (a perfect use for the gorgonzola leftover from the steak I made).

The star of this salad is the vinaigrette. The pomegranate juice is tart (and filled with antioxidants!), but the honey sweetens it up a little. You can make the vinaigrette ahead of time. Mine took a while to boil down to one-third of a cup. My husband really liked this salad!

Dried Fig and Blue Cheese Salad with Pomegranate Vinaigrette
(Adapted from Southern Living, Christmas 2007)
Yield: 6 servings
Ingredients
18 dried mission figs
1 (16-oz.) bottle pomegranate juice (2 cups)
2 tablespoons honey
1 teaspoon Dijon mustard
¼ teaspoon salt
¼ teaspoon freshly ground pepper
¼ cup olive oil
9 cups mesclun salad greens
2 ounces blue cheese, crumbled

Directions
Place figs and pomegranate juice in a medium saucepan; bring to a boil. Reduce heat, cover, and simmer 10 minutes or until figs are softened. Remove figs with a slotted spoon; set aside.

Bring pomegranate juice to a boil over medium-high heat; boil 2 minutes (Kate's took much longer) or until syrupy and reduced to 1/3 cup. Transfer reduction to a bowl; let cool to room temperature.

Add honey and next 3 ingredients to pomegranate reduction; stir with a wire whisk. Gradually whisk in oil.

To serve, divide mesclun greens among 6 serving plates; top each salad with 3 figs. Drizzle evenly with vinaigrette, and sprinkle with blue cheese. Serve immediately.

Make-Ahead Note: Cooked figs and vinaigrette can be stored in refrigerator up to 2 days.


Wednesday, January 20, 2010

Everything But The Kitchen Sink: Honey Barbecued Salmon

I’m in the middle of another busy week and am still recovering from my baking mishap last week. While my newest batch of chocolate crunch granola bakes in the oven, I’m going to take a few minutes to type up a lengthy recipe that I tried a few weeks ago.

The Main Street Ventures restaurants have their own cookbook on display in a number of restaurants we’ve been frequenting for many years. It is a collection of gourmet recipes from their prized restaurants across the country. I’ve been eyeing the cookbook for quite sometime, but for some reason I never purchased it.

In December my husband and I joined our very good friends (and their darling baby girl) for a fabulous birthday dinner where they generously gave me this cookbook (along and a lovely bottle of wine). Some of our favorite dishes from the restaurants are in this cookbook, and the photographs of the food are beautiful. I’ve already attempted a couple recipes from the book, and the first one that I tried was their Honey Barbecued Salmon.

The ingredient list is lengthy and the recipe has you throwing everything but the kitchen sink into the barbecue sauce. At first it seems like overkill, but all of these ingredients meld into a deliciously sweet and spicy glaze. Mine was particularly spicy, as I used the entire jalapeño. (I recommend only using the jalapeño flesh and discarding the membrane and seeds if you don’t want it too spicy. If you are sensitive to hot peppers, you should also use rubber gloves when handling them). Since it is the middle of winter and our ground outside is still white, I followed their instructions to bake then broil the salmon. As soon as it warms up we’re going to try this on the grill! If you don’t like salmon, try the sauce with with chicken!

Honey Barbecued Salmon

(From Mainstreet Ventures Distinctive Recipes)
For Salmon:
Ingredients
1 ½ lb. Salmon filet, boneless and skinless
1 ½ cup Honey Barbeque Sauce (recipe follows)
Salt and pepper, to taste

Directions
Preheat oven to 450°F.

Cut salmon filet into 4 equal pieces. Place parchment paper on a 9x12 inch baking sheet pan. Brush both sides of each salmon piece with barbecue sauce. Season with salt and pepper. Bake in oven for 6 minutes, then switch oven dial to broil and cook salmon for 3 more minutes until salmon just flakes.

Brush lightly with sauce prior to serving. Transfer the salmon onto plates and serve with more sauce, if desire.

For Honey Barbecue Sauce:
Ingredients
1 cup ketchup
1 cup honey
¼ cup coarse-grained mustard
¼ cup Jalapeño pepper, minced
2/ Tbs. rice vinegar
½ tsp. Tabasco
3 Tbs. light brown sugar
1 Tbs. curry powder
1 tsp. sweet paprika
2 garlic cloves, minced
1 Tbs. vegetable oil
½ tsp. Worcestershire sauce
1 tsp. lemon juice
½ tsp. ground black pepper

Directions
In a heavy saucepan, stir together sauce and dry ingredients. Bring to a boil and simmer, stirring occasionally, about 15 minutes. Strain the sauce through a fine sieve. Sauce will keep for one week covered and chilled.


Tuesday, January 5, 2010

Sweet & Tangy: Bruschetta with Gorgonzola Cheese and Honey

Honey and cheese is a fantastic combination. I’ve been served cheese plates in restaurants where they’ve drizzled a little over each wedge of cheese. The sweetness of honey pairs so well with the saltiness, nuttiness, or tanginess of cheese.

Honey really mellows out the tangy gorgonzola in this crunchy crostini. Even if you don’t normally like blue cheese, you may surprise yourself and enjoy this simple, yet scrumptious treat! (This worked as my "blue" hors d'oeuvre for the "Brown Bear" themed birthday party!)

Bruschetta with Gorgonzola Cheese and Honey
(As seen on Everyday Italian)
Ingredients
36 slices (½-inch thick) baguette bread, about 1 loaf
¼ cup extra-virgin olive oil
8 ounces Gorgonzola, sliced
3 Tablespoons honey

Directions
Preheat the oven to 400° F.

Arrange the sliced baguette on a baking sheet. Brush with olive oil. Bake until the bread is pale golden and crisp, about 10 minutes.

Arrange the cheese on the toasts and bake until the cheese is melted, about 3 minutes.

Drizzle the toasts with honey. Place on a serving platter and serve immediately.


Wednesday, December 9, 2009

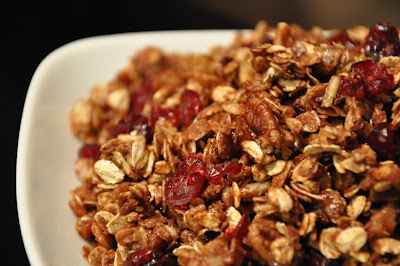
A Little Chocolate A Day: Chocolate Chrunch Granola

I don’t think I’ve ever had a “sweet-tooth”, but I have definitely have a chocolate tooth. I’ve loved chocolate for as long as I can remember. I usually pass on desserts unless they include chocolate. (In attempting to maintain a healthy lifestyle, a dessert has to be “worth it” for me to indulge. Chocolate is worth it.)

I find that it’s rare for a day to pass without having a little chocolate. This is mainly because I have found innovative ways to get my chocolate fix without eating a piece of cake or a scoop of ice cream. I regularly enjoy Pumpkin Chocolate Chip Bread, but also have found Cooking Light’s Chocolate Crunch to be just what I need. It incorporates oats, dried fruit, and nuts with a little taste of chocolate for a reasonable amount of calories per serving size (168 calories for ½ cup). I’ll take this with me to work or when I’m traveling, and it’s perfect for breakfast or a snack.

Chocolate Crunch
(From Cooking Light, December, 2007)
Ingredients
Cooking spray
3 cups regular oats
1 cup oven-toasted rice cereal (such as Rice Krispies)
1/2 cup packed brown sugar
1/3 cup chopped pecans
1/2 teaspoon salt
1/4 teaspoon ground cinnamon
1/4 cup honey
2 tablespoons canola oil
1 teaspoon vanilla extract
2 ounces bittersweet chocolate (60 to 70 percent cocoa), finely chopped
1/2 cup dried cranberries

Directions
Preheat oven to 300°F.

Cover a jelly-roll pan with parchment paper. Coat parchment paper with cooking spray.

Combine oats, rice cereal, brown sugar, chopped pecans, salt, and ground cinnamon in a large bowl.

Combine honey and canola oil in a small saucepan over low heat; cook 2 minutes or until warm. Remove from heat. Add vanilla and chocolate; stir with a whisk until smooth. Pour chocolate mixture over oat mixture. Lightly coat hands with cooking spray. Gently mix chocolate mixture and oat mixture until combined. Spread oat mixture onto prepared jelly-roll pan. Bake at 300° for 20 minutes, stirring after 10 minutes. Cool completely on pan; stir in cranberries.


Friday, November 20, 2009

Figs Part II: Grilled Figs with Greek Yogurt

Yogurt is a food that has it’s health benefits, but a food that I never felt a strong connection to. I would purchase the non-fat, low-calorie yogurts from the grocery store. The consistency always seemed so runny. The flavors available are endless these days, but taste like an imitation.

Last summer I finally found the other side of yogurt: Greek yogurt. And I found my yogurt match. Greek yogurt is thick, creamy, and sour. It is fatty too, but you can also buy low-fat and non-fat Greek yogurts. It is strained in a cloth bag or filter to remove whey, giving it a thick consistency and preserving its sour taste. My friend Beth recently honeymooned in Greece and she was able to validate that the kind we buy at the grocery store here is the same kind that they sell in Greece!

My favorite way to eat Greek yogurt is plain with a little drizzle of honey. At my grocery store they sell Fage yogurt with a little honey compartment. Perfect for a packed lunch! My husband is partial to their yogurt with the strawberry compartment. I’ve also eaten it with fresh fruit, nuts, and even chocolate chips. I’ll substitute Greek yogurt for sour cream in recipes when I can.

When I recently brought back fresh figs from California, I was excited to pair them with some Greek yogurt and honey. We’ve had a mild fall here, and were able to heat up our outdoor grill for potentially the last time this season. This was a fun treat, and another way to savor our fig souvenir.

Grilled Figs with Greek Yogurt
Ingredients
8-12 fresh figs, sliced in half
2 tbsp honey, plus more for drizzling
1 cup low-fat Greek yogurt
¼ cup pistachios, shelled

Directions
Heat grill on high heat. Brush cut side of figs with honey. Place figs on grill, cut side down. Grill for approximately 3 minutes, until figs have grill marks. Remove from heat.

On 4 dessert plates, place on each plate: ¼ Greek yogurt, several figs, a couple tablespoons of pistachios, and drizzle with honey. Serve immediately.


Tuesday, November 10, 2009

Mission Figs: Fig and Goat Cheese Crostini

The last week of October brought me and my husband a little getaway to the Bay. In a trip that was a fusion between work, school, and pleasure, we got to experience the pleasant fall weather in San Francisco, and a lot of time visiting with friends. It is rather ironic how just a year ago it seemed like we hardly knew anyone in Northern California, but now we have friends from SF to San Jose to Oakland. We were welcomed by all of these friends, and split our stay between Oakland and SF. Lucky for us, all of our hosts are fellow "foodies", so we had many memorable meals and abounding tastings of wine.


We stayed a couple nights with our friend Sarah at her fabulous Russian Hill apartment. When we arrived at her place she greeted us with a bottle of wine, hors d'oeuvres, and a plan to watch the sunset from her kitchen, before heading out to dinner. She has what must be one of the most spectacular views of the city and the bay! Her kitchen is a wall of windows, and you can sit at her kitchen table pondering life and watching the city and sailboats go by. The prime time to marvel at her view is when the sun is setting. The sun bounces off of Berkeley in the distance, and the reflection glimmers and twinkles, appearing as bouncing little flames across the cityscape.


Sarah prepared the perfect hors d'oeuvre, without even knowing my affinity for figs. I had actually placed myself on a mission for this trip, and was determined to eat as many figs as possible. This hors d'oeuvre is simple and tasty, and we devoured it before heading to our “real” dinner at hotspot Beretta in the Mission. (I actually could have tasted more figs for dessert at Beretta, but by the time we were offered the dessert menus it was late (particularly on EDT), I was full, and I may have been falling asleep at the table!)

A few days later we stopped at the Berkeley Bowl to pick up picnic supplies for a day in Napa, and I grabbed a couple containers of fresh figs. The ones that made it through the day accompanied me on the plane (in first class, nonetheless – not me, just the figs. Darn overhead bins getting full.) Upon arriving home, I gave half to my mother, and pondered over how I could savor mine. My mind went straight to Sarah’s crostini and I then set forth to replicate it at home.

After an exhausting day at work, I was able to put these together mindlessly and actually ate them as dinner. I’ll long for the next time I have fresh figs to work with. In the meantime I may try this recipe with fig spread, although I tend to pair that with blue stilton cheese. Thank you to Sarah for her generous hospitality and her ideal hors d'oeuvre idea!

Fig and Goat Cheese Crostini
Ingredients
* 1 French baguette, sliced into small ½ inch rounds
* 12 fresh figs, sliced
* 4 oz. fresh goat cheese
* 1 tbsp. honey (preferably lavender honey, if available)

Directions
Preheat oven to 350°F. Place sliced baguette on large baking sheet and bake for approximately 8 minutes, until bread is crispy. Spread goat cheese on baguette slices and top with 1-2 slices of fig, each. Drizzle with honey and serve immediately.

Saturday, October 24, 2009

More Apples: Apple Brandy Pies with Cheddar Crust

The fall foliage is peaking around here, and we are savoring every day of fall. A couple weeks ago we spent the day visiting our favorite cider mill (a perennial favorite and local institution in the town where I grew up), and enjoyed fresh cider and spiced donuts.


We’ve been eating a lot of apples, and I’ve also been cooking with them. It seemed like the perfect time to try a new recipe that I saw.

My friend Christina was kind enough to snail-mail me a copy of a complimentary magazine that is available at her local food store in northern California. The Raley’s Something Extra magazine has a plethora of recipes, and new ways to use different grocery items. I received it in the mail from her one Friday evening when I arrived home after work. I read through the magazine no fewer than three times before the end of the weekend. (I am very thankful that she sent a copy my way!!)

While I’ve flagged many recipes in the Holiday edition of Something Extra, I decided to add a little more apple to our autumn and start off trying their Apple Brandy Pies. I sent them with my husband to his football tailgate today, and I think they’d make a nice hors d'oeuvre or addition to a dessert tray.

Apple Brandy Pies with Cheddar Crust
Ingredients
* 2 tbsp. butter
* 1 large green apple, peeled, cored and chopped
* 1/4 cup apple brandy
* 2 tbsp. honey
* 1 (15-oz.) package refrigerated pie crusts
* 2/3 cup finely shredded sharp Cheddar cheese, divided

Directions
Preheat oven to 400°F and line a baking sheet with parchment paper.

Melt butter in a medium skillet. Add apple and cook over medium heat for 5 minutes. Stir apple brandy and honey into apples and cook over medium-high heat until excess liquid has cooked off; set aside to cool.

Unroll pie crusts and sprinkle 1/3 cup cheese onto each. Press cheese into crust with a rolling pin, rolling into a 10-inch circle. Cut into circles with a 3½-inch cutter. Place equal amounts of filling in each pastry circle, then brush edges of pastry lightly with water. Fold over to enclose filling and press with the tines of a fork to seal.

Place on prepared baking sheet and bake for 15 minutes or until lightly browned.