Showing posts with label Hors d'oeuvre. Show all posts

Thursday, January 7, 2010

White Out: White Bean Dip

This is my last recipe from my "Brown Bear" birthday party theme. (Yes, it has taken me about a month to get through all of them!) To recap, I did an hors d'oeuvre in each of the following colors: brown, red, black, green, blue, yellow, purple, gold, and now white.

It has turned out to be an ideal day to post the white recipe, as it is a white winter wonderland outside! We’re in the middle of a Midwestern snowstorm, and while I made this for dinner tonight, I’ll share with you Giada’s white bean dip – a fun take on hummus (without any tahini, but using cannellini beans for a creamy texture).

I would also like to mention that my friend, Sunny, could use lots of prayers right now. I mentioned a couple of months ago that she is expecting twins, and she has now been hospitalized at 25 weeks. She and her husband live far away from their families, and have a little one at home. Thank you for sending warm, positive thoughts their way.

White Bean Dip
(From Everyday Italian)
Ingredients
1 (15-ounce) can cannellini beans, drained and rinsed
2 cloves garlic
2 tablespoons fresh lemon juice (Kate likes to add a little lemon zest too)
1/3 cup olive oil, plus 4 tablespoons
1/4 cup (loosely packed) fresh Italian parsley leaves
Salt
Freshly ground black pepper
6 pitas
1 teaspoon dried oregano

Directions
Preheat the oven to 400°F.

Place the beans, garlic, lemon juice, 1/3 cup olive oil, and parsley in the work bowl of a food processor. Pulse until the mixture is coarsely chopped. Season with salt and pepper, to taste. Transfer the bean puree to a small bowl.

Cut each pita in half and then into 8 wedges. Arrange the pita wedges on a large baking sheet. Pour the remaining oil over the pitas. Toss and spread out the wedges evenly. Sprinkle with the oregano, salt, and pepper. Bake for 8 to 12 minutes, or until toasted and golden in color.

Serve the pita toasts warm or at room temperature alongside the bean puree.


Tuesday, January 5, 2010

Sweet & Tangy: Bruschetta with Gorgonzola Cheese and Honey

Honey and cheese is a fantastic combination. I’ve been served cheese plates in restaurants where they’ve drizzled a little over each wedge of cheese. The sweetness of honey pairs so well with the saltiness, nuttiness, or tanginess of cheese.

Honey really mellows out the tangy gorgonzola in this crunchy crostini. Even if you don’t normally like blue cheese, you may surprise yourself and enjoy this simple, yet scrumptious treat! (This worked as my "blue" hors d'oeuvre for the "Brown Bear" themed birthday party!)

Bruschetta with Gorgonzola Cheese and Honey
(As seen on Everyday Italian)
Ingredients
36 slices (½-inch thick) baguette bread, about 1 loaf
¼ cup extra-virgin olive oil
8 ounces Gorgonzola, sliced
3 Tablespoons honey

Directions
Preheat the oven to 400° F.

Arrange the sliced baguette on a baking sheet. Brush with olive oil. Bake until the bread is pale golden and crisp, about 10 minutes.

Arrange the cheese on the toasts and bake until the cheese is melted, about 3 minutes.

Drizzle the toasts with honey. Place on a serving platter and serve immediately.


Monday, January 4, 2010

Crab Cocktail: Kate's Layered Crab Dip

This recipe is a fun take on shrimp cocktail, and it is much easier. Instead of peeling, deveining, and poaching shrimp, you are simply layering crabmeat. And instead of your guests having to deal with discarding shrimp tails somewhere, they scoop this up with a cracker. It’s a fun hors d'oeuvre for the holidays because of the colors. I like to add cilantro because it adds freshness and a beautiful bright green color that makes it very eye-pleasing.

Kate’s Layered Crab Dip
Ingredients
8 ounces low-fat cream cheese, softened
6-8 ounces lump crab meat
1 (12 oz.) bottle of cocktail sauce
¼ cup fresh cilantro, chopped
Assorted crackers

Directions
Drain crab meat in a colander and rinse with water. Pat dry with a paper towel.

Spread cream cheese over serving platter. Top with crab meat. Top with cocktail sauce and sprinkle with cilantro. Serve immediately with assorted crackers, such as Water Crackers.


Saturday, January 2, 2010

Sister's Spinach Dip: Spinach and Artichoke Dip

Happy New Year! I hope that you had an exciting New Year’s Eve, and a peaceful start to your new year. I am excited to see what 2010 will bring!

New Year’s Eve is a holiday that I have mixed feelings about. It holds a special place in my heart, as my husband proposed to me on New Year’s Eve eight years ago. Some years I feel like getting dressing up in a little black dress and attending (or hosting) a fabulous party, while other years I prefer sitting on my couch in my pajamas. This year we found a happy medium.

My sister hosted us and another couple (who are such good friends we consider them to be family) at her house. We set out a couple appetizers and played with her young kids. After we put them to bed, we dined on a lovely meal (she made surf ‘n’ turf with beef tenderloin and shrimp) followed by chocolate fondu. We wore comfy clothes and lounged around until the ball dropped.

The day before New Year’s Eve, my sister and I divided up a list of grocery items. She would be visiting a specialty grocery store to purchase the meat, seafood, and wine, while I was planning to go to a basic grocery store for everyday items. My sister was planning on making her go-to spinach dip, but as it was necessary for me to pick up practically all of her ingredients during my grocery run, she suggested that I just make it instead.

Spinach dip seams to be a well-loved appetizer in whatever form it may come in. I have many good memories with high school friends picking up a pre-made container from the grocery deli section and eating it with a loaf of Hawaiian bread. My sister’s version is from Cooking Light and is best when served bubbling hot with tortilla chips.

Spinach and Artichoke Dip
(Adapted from Cooking Light, September, 2007)
Ingredients
2 cups (8 ounces) shredded part-skim mozzarella cheese, divided
½ cup fat-free sour cream
¼ cup (1 ounce) grated fresh Parmesan cheese, divided
¼ teaspoon black pepper
2 garlic cloves, minced
1 (14-ounce) can artichoke hearts, drained and chopped
1 (8-ounce) block 1/3-less-fat cream cheese, softened
1 (8-ounce) block fat-free cream cheese, softened
1 (12-ounce) package frozen chopped spinach, thawed, drained, and squeezed dry
1 (13.5-ounce) package baked tortilla chips (about 16 cups)

Directions
Preheat oven to 350° F.

Combine 1 ½ cups mozzarella, sour cream, 2 tablespoons Parmesan, and next 6 ingredients (through spinach) in a large bowl; stir until well blended. Spoon mixture into a 1 ½-quart baking dish. Sprinkle with remaining ½ cup mozzarella and remaining 2 tablespoons Parmesan.

Bake at 350° for 30 minutes or until bubbly and golden brown. Serve with tortilla chips.


Thursday, December 24, 2009

Colors of Christmas: Pesto & Tomato Tarts

We are two-thirds of the way done with our Christmas celebrations. We started with a family dinner on Christmas Eve-Eve, followed by our traditional gathering on Christmas Eve. Now I am prepping to host Christmas dinner at my house. It has been wonderful spending time with family, but as the way things go with winter weather and little ones, you never know what to expect!

I was so excited to receive two presents (one for Christmas; one for my birthday) that will aid me in my kitchen adventures. It took me fewer than twenty-four hours to break out my new Le Creuset 5-Quart Braiser, and I can’t wait to make my next batch of soup to use my new immersion blender.


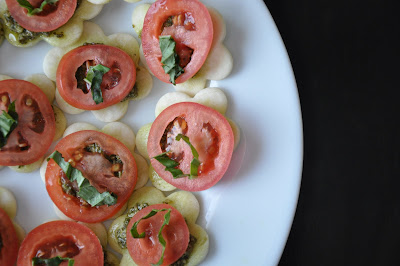
In keeping with the holiday spirit, I have an hors d'oeuvre that is adorned with bright green and red – perfect for a Christmas gathering!

Pesto & Tomato Tarts
Ingredients
2 (9-inch) refrigerated pie crusts
½ cup pesto (can use store-bought)
4 Roma tomatoes, thinly sliced
2 tablespoons fresh basil, thinly sliced

Directions
Preheat oven to 425°F.

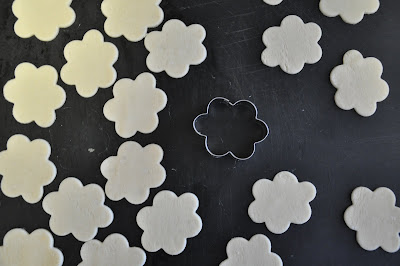
Lay pie crusts on a cutting board. Using a cookie cutter (approximately 1-1 ½ inch in diameter), cut out pieces from pie crusts. Arrange on a large baking sheet and bake for 6 minutes, until lightly golden.

Allow tarts to cool. Spread ½ teaspoon of pesto on each tart, and top with 1 slice of tomato. Garnish each tart with sliced basil and serve immediately.


Tuesday, December 22, 2009

Crowd Pleaser: Baked Brie with Fruit Preserves

It has been too many days since I last posted. My husband and I were celebrating my big birthday in a big way – back in NYC. We weathered the snowstorm, drank lots of champagne, and surrounded ourselves with amazing friends. Now I have to get my act together and plan for Christmas dinner, which is approaching a bit too quickly for me.


My sister called me today to ask for a recipe for an hors d'oeuvre that I had made for her daughter’s birthday party a few weeks ago. The recipe came highly recommended to me from my friend, Christina. This baked brie stole the show among the hors d'oeuvres I brought to the party. My sister even declared that she liked this version better than my usual baked brie with caramelized onions that I had been making for the past seven years (which is also delicious).

You can use your favorite flavor of preserves in this recipe. Christina’s favorite is apricot. I was in need of a black-colored hors d'oeuvre for my “Brown Bear” theme, so I used blackberry preserves, and also garnished with some fresh blackberries. I’m going to make this again myself on Christmas and just purchased some raspberry preserves to try. (I think the red preserves and the green apple slices will look pretty for Christmas). Christina was correct when she said this is definitely a crowd pleaser!

Baked Brie with Fruit Preserves

Ingredients
1 wheel of brie
1 cup your favorite fruit preserves
1 sheet puff pastry
Optional garnish – fresh fruit (same as preserves)
Serve with crackers and apple slices

Directions
Thaw sheet of puff pastry by allowing it to sit at room temperature for 40 minutes.

Preheat oven to 350°F.

Take a wheel of brie and using a sharp knife, cut off the case around the edges of the cheese. Wrap brie wheel in puff pastry. Cover the pastry with preserves. Place on a non-stick baking sheet (or one that has been coated in cooking spray), and bake for 30 minutes.

Garnish with fresh fruit, if desired. Serve immediately with crackers and apple slices.


Thursday, December 17, 2009

Signora DiVinici: Grape and Olive Compote

Another recipe that I tried for my niece’s birthday was from my friend, Christina. She recommended to me the historical fiction novel, Signora DiVinici to read. I recently received the book through an online mail order, and am hoping to find some time during my upcoming winter break to read it. Apparently the heroine cooks throughout the book and this recipe is included at the end.

As I was cooking for a crowd that included some non-olive-eaters, I omitted them and added some toasted walnuts instead. It was the perfect “purple” addition for my Brown Bear theme. I spread goat cheese on crostini and topped them with the grape and walnut compote. The recipe below is the original version with olives.

Grape and Olive Compote

Ingredients
2 cups red seedless grapes
1 cup olives
3 Tablespoons olive oil
3 Tablespoons balsamic vinegar
3 Tablespoons thyme

Directions
Toss everything in a glass bowl and put into 350°F oven for one hour – tossing every 20 minutes to coat.

Serve with goat cheese and crusty bread.


Tuesday, December 15, 2009

Crispy Ham: Kate's Prosciutto Chips

I’ve recently starting adding a salami selection to my hors d'oeuvre offerings, as it is a favorite of my brother-in-law. For my niece’s birthday party, I wanted to do something beyond unwrapping salami and placing it on a platter. I decided to make Prosciutto Chips, which are something I recently discovered while trying to use up leftover prosciutto.

Last summer I had some extra prosciutto from another recipe. My husband had mumbled something infering he wasn’t interested in eating it uncooked (prosciutto crudo). I decided to bake it in the oven until it turned very crispy, and I then tossed it with a salad for him. He loved it, and the crispiness of this Italian dry-cured ham resembled bacon, with a bit more elegance. Prosciutto Chips are a great garnish for a salad, but also work on their own as a snack or on a meat tray. Serve them with assorted meats, cheeses, nuts, and fruit.

Kate’s Prosciutto Chips

Ingredients
4 oz. prosciutto, thinly sliced

Directions
Preheat oven to 250°F. Cover a large baking sheet with parchment paper, or spray with non-stick cooking spray.

Cut prosciutto slices in half, and then into 1-inch strips. Lay prosciutto strips on baking sheet and bake for 45 minutes, until crispy.


Monday, December 14, 2009

She Does it Again: Garlic-Onion Cheese Spread

When my sister assigned me to bring hors d'oeuvres to my niece’s 1st birthday party, I contacted my friend Christina to see if she had any new recipes I could try. She definitely came through and gave me a wonderful assortment to choose from. One of her recommendations was a cheese spread that she described as simple but delicious. I looked over the ingredients and found it to be an interesting combination – bacon, apricot, and garlic all in one dip? Christina has a very trustworthy palate and added this recipe to my list (praying that it would turn out somewhat yellow for the “Brown Bear” theme).

The recipe calls for bacon, and I substituted with soy bacon (aka “Fakin’”). This was a huge hit! The party guests loved it, and no one could quite pin-point all of the ingredients! Another winner from Christina, and one that will be added to my hors d'oeuvre repertoire.

Garlic-Onion Cheese Spread
Ingredients
2 packages cream cheese, softened
2-3 Tablespoons apricot preserves
3 green onions, chopped
3 Tablespoons cooked bacon (or soy bacon), crumbled
½ to 1 teaspoon garlic, minced
Dash freshly ground black pepper
Serve with assorted crackers

Directions
In small mixing bowl, beat cream cheese and preserves until blended. Stir in onions, back, garlic, and pepper. Refrigerate until serving. Serve with crackers.


Sunday, December 13, 2009

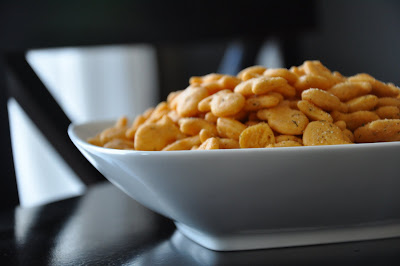
Ambitious or Insane: Seasoned Goldfish Crackers

I never thought I would be sharing a recipe for Goldfish Crackers. In fact, I can’t recall the last time I had one prior to making this. This recipe is a fun way to make a common cracker a little fancier, and yes, there is a reason why I did it myself!

In early December, my niece turned one-year old. My sister planned a “Brown Bear” themed birthday party for her, based on the popular children’s picture book. Per usual, I was assigned to bring the hors d'oeuvres to the party. One week ago my sister and I shared the backseat of her car, as our husbands sat up front and drove us on a mini-road trip to attend our cousin’s wedding. With cooking magazines piled on our laps, I asked for her input on what I should make for the birthday party. Understanding how busy and chaotic my job has been lately, she advised me to do whatever would be easy (as long as I brought my layered taco dip). We continued talking and looking at recipes, and an idea was born! I grabbed a scratch piece of paper, found a pen in the glove box, and we started formulating a menu. We decided that in keeping with the party theme, I could make one appetizer for each corresponding color used in the story.


The list came together easier than we thought it would. There were some items my sister recommended I just buy from the store, to make my life easier (which I, of course, didn't do). One of her suggestions was to just put out a bowl of plain Goldfish Crackers.


Once we returned home from the wedding, I had five days to plan, shop, and prepare all of the hors d'oeuvres. I did whatever I could ahead of time, and got started early on Saturday morning. I was excited about this creative approach, and felt ambitious to be trying so many new recipes (only one was a personal repeat). I was about three-quarters of the way done when I started running out of time. I realized that I was leaning more towards insane than ambitious. With the clock ticking, it was like my own Iron Chef episode, however the version where the chef is also trying to do laundry and get dressed for a party.

When my last item came out of the oven, we dashed over to my sister’s house and arrived on time (although not early like she had asked). The guests were waiting and they were hungry. (Only one person asked where my layered taco dip was, and I suspect that he may have been prompted to do so!) The hors d'oeuvres were inhaled, and I was ready for a nap! (This recipe makes a ton!)

Seasoned Goldfish Crackers
Ingredients
18 ounces cheddar cheese goldfish crackers
1 ounce powdered ranch dressing mix
3 teaspoons dill weed
½ teaspoon garlic powder
½ teaspoon lemon-pepper seasoning
¼ teaspoon cayenne pepper
2/3 cup olive oil

Directions
Place crackers in a large bowl. Combine the remaining ingredients. Drizzle over crackers and toss to coat evenly. Transfer to a large baking pan. Bake at 250°F for about 15 - 20 minutes stirring occasionally. Cool completely and store in an airtight container.