Showing posts with label Cheddar Cheese. Show all posts

Sunday, March 28, 2010

A New Chef in the Kitchen: Sausage Stuffed Jalapeños

My brother-in-law has been in my life for over half of it. He and my sister have been together for that long, and thinking about that statistic is wonderful, but it also reminds me of how old I am! He’s never been one to join in on the cooking marathons my mom, sister, and I have together, although he’s dabbled in some adventurous cooking, like brewing his own beer and making bacon.

When we gathered last weekend for my mom’s birthday, he showed up with his own contribution to our spread. He made stuffed jalapeños for the first time. While I couldn’t try them myself, the entire batch was devoured by three adults before dinner was ready. He didn’t have any parmesan cheese, and substituted with cheddar (his favorite cheese) instead. I think that I could try making these myself by substituting some sautéed veggies for the sausage. I'm looking forward to seeing what he comes up with next time!

I would like to give a shout out to my friend, Sunny. She and her twins have made it to 37 weeks - full term - with the past couple months spent on bed rest. She is a total rock star, and her mom is an angel for flying across the country to spend the past couple months with her, looking after her 2-year-old son.

Sausage Stuffed Jalapeños
(From AllRecipes)
Ingredients
1 pound ground pork sausage
1 (8 ounce) package cream cheese, softened
1 cup shredded Parmesan cheese (Kate's brother-in-law used cheddar cheese)
1 pound large fresh jalapeño peppers, halved lengthwise and seeded
1 (8 ounce) bottle Ranch dressing (optional)

Directions
Preheat oven to 425°F.

Place sausage in a skillet over medium heat, and cook until evenly brown. Drain grease.
In a bowl, mix the sausage, cream cheese, and Parmesan cheese. Spoon about 1 tablespoon sausage mixture into each jalapeño half. Arrange stuffed halves in baking dishes.

Bake 20 minutes in the preheated oven, until bubbly and lightly browned. Serve with Ranch dressing, if desired.


Thursday, November 19, 2009

Best Chili Ever: Quinoa Chili

Are you sick of quinoa yet? Because I am certainly not! I keep trying out new recipes of this wonder-grain, and I can’t seem to get enough of it. Just the other week my friend, Beth, forwarded me a recipe for Quinoa Chili. I was rather anxious to try it, because I’ve eaten at Beth’s place before, and I know that she is an excellent cook. At a mid-summer dinner that she and her husband hosted me and my husband for, she prepared our entire scrumptious meal from scratch, including the corn tortillas!

The Quinoa Chili goes together easily, and it is delicious! This is the best vegetarian version of chili that I have ever had. It is hearty yet healthy, and I am so thankful that Beth sent this one my way! You can gave fun with the garnishes, and add whatever you like.


Quinoa Chili

Ingredients
1 Tbsp olive oil
1 medium onion, chopped
3 carrots, chopped
3 stalks celery, chopped
1 teaspoon salt
2 cloves garlic, minced
1 large green pepper, diced
2 teaspoon cumin
1-2 teaspoon chili powder
1 teaspoon dried oregano
1/4 teaspoon cinnamon
1/8 teaspoon cayenne
2/3 cup quinoa, rinsed in warm water and drained
1 cup fresh or frozen corn
2 (14 oz.) cans tomato sauce
1 (14 oz.) can small diced tomatoes
1 cup vegetable broth or water
1 (14 oz.) can kidney beans, rinsed and drained (I sometimes substitute with black beans)

Directions
Heat oil in a Dutch oven or large skillet on medium heat. Add onion, carrots, celery, salt, garlic, green pepper and spices; sauté 5 to 10 minutes. Add rinsed uncooked quinoa and stir in. Add corn, tomatoes, tomato sauce and vegetable broth/water to onion and quinoa mixture. Cover and simmer together 20 minutes. Add kidney beans; simmer another 10 minutes.

If chili is too thick, just add water or more vegetable broth until it is to your liking.

Toppings: shredded cheese, sour cream, avocado, corn chips, green onions.


Sunday, November 8, 2009

Two for Two: Grilled Chicken & Avocado Sandwich, and Chicken Quesadillas with Avocado Cream

I’m back. In the kitchen, that is. After an embarrassing amount of time eating take-out, I found some time today to venture to the three grocery stores and back into my kitchen. To my delightful surprise, while I was at the store my mother stopped by to drop off some more homemade food (vegetable pot pie, which I am so excited to try!). My family has a way with food, and in times of need (sickness, loss of loved ones, births of babies, moving, returning from a trip, etc.) we provide each other with healthfully prepared homemade meals. Thanks, Mom!

My first order of business in the kitchen was to help out a friend in need. “Sunny” and I go way back (definitely first grade, and if I could find a class photo, I might be able to confirm kindergarten too). She is married to her high school sweetheart (I was privileged to witness their budding romance in the high school Honors English class we all took together), and they currently reside in Seattle.

In March I took a business-related trip to Seattle, and my husband tagged along as it was a destination previously unexplored to us both, but on our list of places to visit. We used our time in town to get together with Sunny. We met her, her husband, and their adorable little boy for brunch. They picked a fantastic brunch spot, and if you’re in the Seattle area, I definitely recommend Table 219. We got to witness their son’s first taste of one of my favorite foods, sweet potato fries. Even more notable, though, was his first taste of a grapefruit, and none of the adults at the table could grasp why this little one-year-old seemed so keen on such a tart and bitter taste.


Sunny has since shared the exciting news that they will be expanding their family by two! With twin baby boys on the way she is needing to up her caloric intake, however this carb-o-holic has been having an aversion to practically all food! I asked if I could help in any way, and she said that she had some mediocre guacamole at a restaurant and it agreed with her stomach. She asked for a recipe with avocado and some chicken (to add protein). I have two, and they also offer up some calcium (cheese), carbs (sandwich rolls and tortillas), and veggies (carrots, tomatoes).

The first recipe is a chicken sandwich that works well when you’re having company. There is little prep work, and the sandwiches can be assembled by each guest. It is easy to up the quantity, and grill a lot of chicken breasts for a large crowd. If you’re (having twins and) looking to add some more protein, fat, and calories, you can add bacon too! (You can also add an extra slice of cheese.)

Kate's Grilled Chicken and Avocado Sandwich
Ingredients
* 4 skinless, boneless chicken breasts
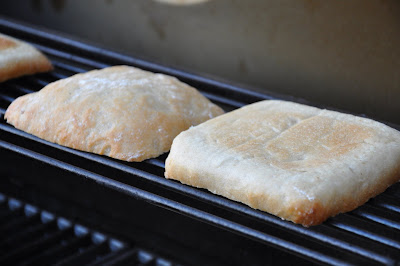
* 4 sandwich rolls (I used ciabatta rolls, but hamburger buns will work too)
* 1 cup Italian salad dressing
* 1 beefsteak tomato, sliced
* 1 large avocado, sliced
* 1 lime or lemon, zest and juice
* ½ cup mayonnaise
* 4 slices provolone cheese

Directions
Marinate chicken in salad dressing for 1-2 hours in the refrigerator. Preheat grill. Grill chicken breasts for about 5-6 minutes on each side, or until thoroughly cooked; the meat should be solid white throughout. Grill sandwich rolls, cut side down, for about 2-3 minutes, until bread is toasted.

Meanwhile, in a small bowl combine lime or lemon zest, juice, and mayonnaise.

Assemble sandwiches, placing on each sandwich roll: one chicken breast, one slice of cheese, 2 slices on tomato, 2 tbsp. mayonnaise mixture, several slices of avocado.


The second recipe is a new one that I just tried. The final product looked (and smelled) so good to me that I think I’m going to have to make it again as a vegetarian version so that I can try it too. The recipe is from Cooking Light, and includes a fruit salsa. It was too difficult to find the exotic fruits it calls for in the Midwest in November, so I omitted it altogether. Sunny, you may want to use regular sour cream instead of fat-free. These will work as an entrée, appetizer, or hors d'oeuvre.

Chicken Quesadillas with Avocado Cream
(Adapted from Cooking Light, July 1998)
Ingredients
* Cooking spray
* 1 1/3 cups shredded carrot
* 1 cup thinly sliced green onions
* 1 cup (4 ounces) shredded Monterey Jack cheese with jalapeño peppers, divided
* 8 (8-inch) fat-free flour tortillas
* 2 cups chopped ready-to-eat roasted skinned, boned chicken breasts (such as Tyson; about 2 breasts)
* 1/2 cup fresh cilantro leaves
* Avocado Cream (recipe follows)

Directions
Place a large nonstick skillet coated with cooking spray over medium-high heat until hot. Add shredded carrot and onions; sauté 5 minutes or until tender. Sprinkle 2 tablespoons shredded cheese over each of 4 tortillas, and divide carrot mixture evenly over tortillas. Top each tortilla with 1/2 cup chicken, 2 tablespoons cilantro leaves, and 2 tablespoons cheese, and top with a tortilla.

Place skillet coated with cooking spray over medium heat until hot. Add 1 quesadilla, and cook 2 minutes on each side or until quesadilla is browned. Repeat with the remaining quesadillas. Cut each quesadilla into 6 wedges. Arrange 4 quesadilla wedges on each of 6 plates. Top each serving about 3 tablespoons Avocado Cream.


Avocado Cream
Ingredients
* 1 peeled medium avocado, pitted and cut into chunks
* 1/2 cup fat-free sour cream
* 2 tablespoons fresh lime juice
* 2 tablespoons minced fresh cilantro

Directions
Place first 3 ingredients in a blender; process until smooth. Spoon pureed mixture into a small bowl; stir in cilantro. Cover and chill.


UPDATE: She liked it!!!

Saturday, October 24, 2009

More Apples: Apple Brandy Pies with Cheddar Crust

The fall foliage is peaking around here, and we are savoring every day of fall. A couple weeks ago we spent the day visiting our favorite cider mill (a perennial favorite and local institution in the town where I grew up), and enjoyed fresh cider and spiced donuts.


We’ve been eating a lot of apples, and I’ve also been cooking with them. It seemed like the perfect time to try a new recipe that I saw.

My friend Christina was kind enough to snail-mail me a copy of a complimentary magazine that is available at her local food store in northern California. The Raley’s Something Extra magazine has a plethora of recipes, and new ways to use different grocery items. I received it in the mail from her one Friday evening when I arrived home after work. I read through the magazine no fewer than three times before the end of the weekend. (I am very thankful that she sent a copy my way!!)

While I’ve flagged many recipes in the Holiday edition of Something Extra, I decided to add a little more apple to our autumn and start off trying their Apple Brandy Pies. I sent them with my husband to his football tailgate today, and I think they’d make a nice hors d'oeuvre or addition to a dessert tray.

Apple Brandy Pies with Cheddar Crust
Ingredients
* 2 tbsp. butter
* 1 large green apple, peeled, cored and chopped
* 1/4 cup apple brandy
* 2 tbsp. honey
* 1 (15-oz.) package refrigerated pie crusts
* 2/3 cup finely shredded sharp Cheddar cheese, divided

Directions
Preheat oven to 400°F and line a baking sheet with parchment paper.

Melt butter in a medium skillet. Add apple and cook over medium heat for 5 minutes. Stir apple brandy and honey into apples and cook over medium-high heat until excess liquid has cooked off; set aside to cool.

Unroll pie crusts and sprinkle 1/3 cup cheese onto each. Press cheese into crust with a rolling pin, rolling into a 10-inch circle. Cut into circles with a 3½-inch cutter. Place equal amounts of filling in each pastry circle, then brush edges of pastry lightly with water. Fold over to enclose filling and press with the tines of a fork to seal.

Place on prepared baking sheet and bake for 15 minutes or until lightly browned.


Monday, August 31, 2009

Grown-Up Grilled Cheese: Sweet and Spicy Grilled Cheese Sandwiches

I had a different recipe ready to post tonight, but I am so excited about what I made for dinner that it moved up straight to front of the queue! Grilled cheese is such a versatile sandwich, and one that brings me back to my childhood. There are so many variations that you can make with a grilled cheese. My sister adds ham to make herself a "Gooey Ham & Cheese". You can try any variety of cheeses (my standard is made of Parmigiano-Reggiano and Gruyere). A very long time ago, I dined at the Sci-Fi Dine-In Theater when I was visiting Disney World for a high school cheerleading competition. I ordered a grilled cheese and requested a pickle on the side. My sandwich was instead delivered to our table with the pickle in the grilled cheese and it turned out to be an excellent combination!

I recently found a recipe in Ellie Krieger’s The Food You Crave for a different version of the grilled cheese. While I’ve added tomatoes to a grilled cheese before myself, it is her addition of the caramelized onions that makes this sandwich so special, and more of a grown-up version. (Although I think my 2-year-old nephew would love it just as much as we did!)

After a very long day at work today, I arrived home late and was still able to whip this up in no time. I used High Five Fiber bread from Great Harvest Bread Co., fresh tomatoes from the farmers’ market, and used my grill pan with a sandwich press. You could also use a Panini maker if you have one, and I’ll admit that I have been known to make a grilled cheese by assembling the sandwiches and just letting them bake on a sheet pan in the oven (not a preferable method, but a bit more convenient when you don’t have a few minutes to stand in front of the stove flipping sandwiches). I served the sandwiches with the Roasted Tomato and Cognac soup I made over the weekend, and this meal hit the spot!

Sweet and Spicy Grilled Cheese Sandwiches

Ingredients
* 2 teaspoons canola oil
* 1 large red onion, finely diced (or sliced)
* Salt
* Freshly ground black pepper
* 3 ounces sharp Cheddar, thinly sliced, divided
* 8 slices whole-wheat bread
* 3 ounces pepper Jack cheese, thinly sliced, divided
* 1 large or 2 medium beefsteak or hothouse tomatoes, sliced
* Cooking spray

Directions
Heat oil in a nonstick skillet over medium-high heat. Lower heat to medium. Add onions and saute, stirring, until edges are browned, about 10 to 12 minutes. Season with salt and freshly ground black pepper, to taste.

Place 3/4-ounce Cheddar on 1 slice bread. Spread 1 tablespoon caramelized onions on top of cheese and top with 3/4-ounce pepper Jack. Top with 1 large or 2 medium slices tomato and other slice of bread. Repeat with 3 other sandwiches.

Spray a nonstick skillet or griddle with cooking spray and heat until hot. Place sandwich on griddle and weigh down with a heavy skillet or plate. Lower heat to medium-low and grill until underside is a deep brown but not burnt and cheese is partially melted, about 5 to 6 minutes. Flip sandwich and grill other side, an additional 4 to 5 minutes. Slice in half and serve hot.