Showing posts with label Cilantro. Show all posts

Sunday, February 7, 2010

Superbowl Sunday: Sweet Potato & Black Bean Chili

It is Superbowl Sunday, and the first one in several years that we are not watching the commercials game at my sister’s house. After a weekend packed full of obligations and chores, we needed a few hours at home this evening to get our wits about us before beginning another long week. (Okay, I needed a few hours at home and my husband was kind enough to find contentment in watching the game from our own couch.)

My sister usually makes a chili and a fish stew to serve for her party guests during the Superbowl, followed by fondue or another fun dessert. My husband and I just finished off my second batch of Cioppino, so I opted to make some chili for us to eat tonight. A few weeks ago I found a recipe online for a vegetarian chili that calls for black beans and sweet potatoes – two of my favorite foods (that fortunately pair so well together, like in Sweet Potato & Black Bean Burritos).

I made this yesterday, and completed it today by stirring in the cilantro and garnishing with some cheese, sour cream, and diced avocado. The recipe is quite simple, and you can feel free to adjust the seasonings to your own taste buds (the chipotle powder will make it smoky and spicy!). The recipe states that it serves two, so I doubled it. I wound up with a good amount that will last us into the week. I hope that your Superbowl Sunday was filled with some good eats, regardless of where you happened to be!

Sweet Potato & Black Bean Chili
(From Eating Well)
Serves 2
Ingredients
2 teaspoons extra-virgin olive oil
1 small onion, finely diced
1 small sweet potato, peeled and diced
2 cloves garlic, minced
1 tablespoon chili powder
2 teaspoons ground cumin
¼ teaspoon ground chipotle chile (Chipotle peppers are dried, smoked jalapeno peppers. Ground chipotle can be found in the specialty spice section of most supermarkets.)
1/8 teaspoon salt, or to taste
1 1/3 cups water
1 (15-ounce) can black beans, drained and rinsed
1 cup canned diced tomatoes
2 teaspoons lime juice
2 tablespoons chopped fresh cilantro

Directions
Heat oil in a large saucepan over medium-high heat. Add onion and potato and cook, stirring often, until the onion is slightly softened, about 4 minutes. Add garlic, chili powder, cumin, chipotle and salt and cook, stirring constantly, until fragrant, about 30 seconds. Add water, bring to a simmer, cover, reduce heat to maintain a gentle simmer and cook until the potato is tender, 10 to 12 minutes. Add beans, tomatoes and lime juice; increase heat to high and return to a simmer, stirring often. Reduce heat to maintain a simmer and cook until slightly reduced, about 4 minutes. Remove from the heat and stir in cilantro.


Monday, January 4, 2010

Crab Cocktail: Kate's Layered Crab Dip

This recipe is a fun take on shrimp cocktail, and it is much easier. Instead of peeling, deveining, and poaching shrimp, you are simply layering crabmeat. And instead of your guests having to deal with discarding shrimp tails somewhere, they scoop this up with a cracker. It’s a fun hors d'oeuvre for the holidays because of the colors. I like to add cilantro because it adds freshness and a beautiful bright green color that makes it very eye-pleasing.

Kate’s Layered Crab Dip
Ingredients
8 ounces low-fat cream cheese, softened
6-8 ounces lump crab meat
1 (12 oz.) bottle of cocktail sauce
¼ cup fresh cilantro, chopped
Assorted crackers

Directions
Drain crab meat in a colander and rinse with water. Pat dry with a paper towel.

Spread cream cheese over serving platter. Top with crab meat. Top with cocktail sauce and sprinkle with cilantro. Serve immediately with assorted crackers, such as Water Crackers.


Monday, November 16, 2009

Celebration in Oaktown: Quinoa, Wild Shrimp & Roasted Beet Salad with Orange Vinaigrette

During our recent trip out to the Bay, we were graciously welcomed by our friends, Amy and Chris. We spent a few days with them in Oakland, along with a fun-filled excursion to Napa. The four of us decided to venture to an area of wine country that was previously unexplored to us all – northern Napa county. We did the drive north past Napa and Oakville, and found ourselves driving through the rolling hills of northern Napa county and quaint towns of St. Helena and Calistoga. St. Helena had buildings with Victorian charm, while Calistoga reminded us of the wild west. The first stop on our wine tour took us to Chateau Montelena Winery, where we marveled at the stone castle, as well as their orange and lemon trees (the wines were good too, particularly their Riesling).


We next ventured to Sterling Vineyards, where a aerial tram takes visitors up to the winery and tasting rooms at the top of the hill.


Our last stop was Cuvaison Estate, where we had a sample of a special Cab, and the sommelier tried to show my husband a thing or two with our camera. After a wonderful meal at Tra Vigne, Chris and Amy gave us a lift to the airport, and we barely made our red-eye flight back home.


Earlier that week, Amy had been scheduled to take a graduate exam that she had long been studying for. While she was off at her exam, I went into San Francisco in search of the Painted Ladies. After an uncalculated walk through the Tenderloin, I finally found the famous row houses and had enough time to snap some pictures before heading back to Oakland to meet Amy.


She had aced the exam and a celebration was in order. Amy, Chris, and I went to a celebratory lunch at Bocanova in Jack London Square. After debating over several options on the menu, Amy and I both ordered the Quinoa, Wild Shrimp & Roasted Beet Salad with Orange Vinaigrette. It was delicious - so refreshing, light, and flavorful! As a fellow cook and foodie, Amy and I spent most of the meal trying to determine how it was prepared.


With the sun shining and a pleasant breeze blowing, Amy and I continued the celebration with a little wine tasting. And on this day, we did not have to hop in a car and drive north of the city to get to wine country. We instead only had to walk a few blocks to get to a couple of Oakland’s wineries. The tasting rooms of JC Cellars and Dashe Cellars are both in Oakland, and share the same location. You can taste flights of wine from each winery for $5, respectively (much cheaper than wineries in wine country!). Amy and I spent the afternoon sampling wines from JC and Dashe, and it was the perfect afternoon to follow up our delectable lunch.


I couldn’t get that quinoa out of my mind, and once I returned home and had a chance to spend time in the kitchen, I made an attempt to recreate our lunch (less the wine tasting). I was pleased that my version was pretty comparable to the dish that we had! I was only able to find a purple beet at my grocery store, but I recommend using a golden beet if you can find it. (The purple beet will color the whole dish, and if you are using one, I recommend adding it at the last minute to try to avoid coloring the rest of the ingredients purple.) You can omit the shrimp for a vegetarian version. Amy and I were contemplating adding some crumbled feta, which I did try, but found it to be too much. This is good as it is, and a lunch that I’ll forever remember!

Kate's Quinoa, Wild Shrimp & Roasted Beet Salad with Orange Vinaigrette
Ingredients
½ cup extra virgin olive oil
¼ cup freshly squeezed orange juice
1 tbsp. Dijon mustard
1 tbsp champagne vinegar
1 medium-size golden beet
1 cup quinoa, rinsed and drained
2 cups vegetable broth
1 cup carrots, shredded
10 oz. cooked shrimp, peeled and deveined
1 orange, segmented
½ cup cilantro, chopped
Kosher salt and freshly ground black pepper, to taste
4 tbsp. watercress or microgreens, for garnish

Directions
Wisk together olive oil, orange juice, mustard, champagne vinegar, and a dash of salt and pepper. Cover and refrigerate.

Preheat oven to 400 °F. Cut off beet greens, wash beets, and gently scrub to remove any dirt. Wrap beet in aluminum foil and place in the middle rack of the oven. Bake until beet is thoroughly cooked (approximately 1 hour). Unwrap beet and allow to cool. Using a paper towel, rub off the beet’s skin. Cut beet into small cubes.

Place quinoa and vegetable broth in a 1 ½ quart saucepan and bring to a boil. Reduce to simmer, cover and cook until all broth is absorbed (10-15 minutes). Allow quinoa to cool.

In a large bowl, combine quinoa, shrimp, orange segments, carrots, cilantro, beets, and salt and pepper. Toss with vinaigrette mixture until lightly coated (you may not use all of the vinaigrette). Top with watercress or microgreens to garnish and serve.


Sunday, November 8, 2009

Two for Two: Grilled Chicken & Avocado Sandwich, and Chicken Quesadillas with Avocado Cream

I’m back. In the kitchen, that is. After an embarrassing amount of time eating take-out, I found some time today to venture to the three grocery stores and back into my kitchen. To my delightful surprise, while I was at the store my mother stopped by to drop off some more homemade food (vegetable pot pie, which I am so excited to try!). My family has a way with food, and in times of need (sickness, loss of loved ones, births of babies, moving, returning from a trip, etc.) we provide each other with healthfully prepared homemade meals. Thanks, Mom!

My first order of business in the kitchen was to help out a friend in need. “Sunny” and I go way back (definitely first grade, and if I could find a class photo, I might be able to confirm kindergarten too). She is married to her high school sweetheart (I was privileged to witness their budding romance in the high school Honors English class we all took together), and they currently reside in Seattle.

In March I took a business-related trip to Seattle, and my husband tagged along as it was a destination previously unexplored to us both, but on our list of places to visit. We used our time in town to get together with Sunny. We met her, her husband, and their adorable little boy for brunch. They picked a fantastic brunch spot, and if you’re in the Seattle area, I definitely recommend Table 219. We got to witness their son’s first taste of one of my favorite foods, sweet potato fries. Even more notable, though, was his first taste of a grapefruit, and none of the adults at the table could grasp why this little one-year-old seemed so keen on such a tart and bitter taste.


Sunny has since shared the exciting news that they will be expanding their family by two! With twin baby boys on the way she is needing to up her caloric intake, however this carb-o-holic has been having an aversion to practically all food! I asked if I could help in any way, and she said that she had some mediocre guacamole at a restaurant and it agreed with her stomach. She asked for a recipe with avocado and some chicken (to add protein). I have two, and they also offer up some calcium (cheese), carbs (sandwich rolls and tortillas), and veggies (carrots, tomatoes).

The first recipe is a chicken sandwich that works well when you’re having company. There is little prep work, and the sandwiches can be assembled by each guest. It is easy to up the quantity, and grill a lot of chicken breasts for a large crowd. If you’re (having twins and) looking to add some more protein, fat, and calories, you can add bacon too! (You can also add an extra slice of cheese.)

Kate's Grilled Chicken and Avocado Sandwich
Ingredients
* 4 skinless, boneless chicken breasts
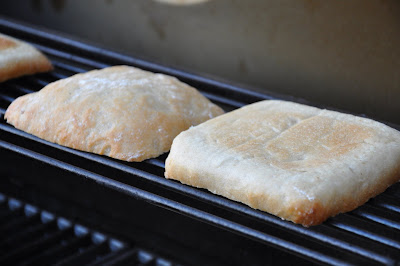
* 4 sandwich rolls (I used ciabatta rolls, but hamburger buns will work too)
* 1 cup Italian salad dressing
* 1 beefsteak tomato, sliced
* 1 large avocado, sliced
* 1 lime or lemon, zest and juice
* ½ cup mayonnaise
* 4 slices provolone cheese

Directions
Marinate chicken in salad dressing for 1-2 hours in the refrigerator. Preheat grill. Grill chicken breasts for about 5-6 minutes on each side, or until thoroughly cooked; the meat should be solid white throughout. Grill sandwich rolls, cut side down, for about 2-3 minutes, until bread is toasted.

Meanwhile, in a small bowl combine lime or lemon zest, juice, and mayonnaise.

Assemble sandwiches, placing on each sandwich roll: one chicken breast, one slice of cheese, 2 slices on tomato, 2 tbsp. mayonnaise mixture, several slices of avocado.


The second recipe is a new one that I just tried. The final product looked (and smelled) so good to me that I think I’m going to have to make it again as a vegetarian version so that I can try it too. The recipe is from Cooking Light, and includes a fruit salsa. It was too difficult to find the exotic fruits it calls for in the Midwest in November, so I omitted it altogether. Sunny, you may want to use regular sour cream instead of fat-free. These will work as an entrée, appetizer, or hors d'oeuvre.

Chicken Quesadillas with Avocado Cream
(Adapted from Cooking Light, July 1998)
Ingredients
* Cooking spray
* 1 1/3 cups shredded carrot
* 1 cup thinly sliced green onions
* 1 cup (4 ounces) shredded Monterey Jack cheese with jalapeño peppers, divided
* 8 (8-inch) fat-free flour tortillas
* 2 cups chopped ready-to-eat roasted skinned, boned chicken breasts (such as Tyson; about 2 breasts)
* 1/2 cup fresh cilantro leaves
* Avocado Cream (recipe follows)

Directions
Place a large nonstick skillet coated with cooking spray over medium-high heat until hot. Add shredded carrot and onions; sauté 5 minutes or until tender. Sprinkle 2 tablespoons shredded cheese over each of 4 tortillas, and divide carrot mixture evenly over tortillas. Top each tortilla with 1/2 cup chicken, 2 tablespoons cilantro leaves, and 2 tablespoons cheese, and top with a tortilla.

Place skillet coated with cooking spray over medium heat until hot. Add 1 quesadilla, and cook 2 minutes on each side or until quesadilla is browned. Repeat with the remaining quesadillas. Cut each quesadilla into 6 wedges. Arrange 4 quesadilla wedges on each of 6 plates. Top each serving about 3 tablespoons Avocado Cream.


Avocado Cream
Ingredients
* 1 peeled medium avocado, pitted and cut into chunks
* 1/2 cup fat-free sour cream
* 2 tablespoons fresh lime juice
* 2 tablespoons minced fresh cilantro

Directions
Place first 3 ingredients in a blender; process until smooth. Spoon pureed mixture into a small bowl; stir in cilantro. Cover and chill.


UPDATE: She liked it!!!

Sunday, October 11, 2009

Celebrity Sighting: Sweet Potato and Black Bean Burritos

A perk of living in New York City is all of the celebrity sightings that you happen upon during your everyday routine. My husband and I used to keep a list of everyone we ran into in the street, in stores, at work, in church… you name it! After a few years, the conversation turned into, “who haven’t we seen?” I remember the first movie/television set I saw in the city. I had been working in NYC for only a couple weeks, and saw a film crew set up on my way to work. I thought to myself, “How can I go to work now? I need to stay and watch the production all day!” I made it to work, and the awe that I had from my first film set encounter quickly turned into, “Get out of way, I have to get to work!!” (For the record, Law & Order loved to film on the streets I used to walk from our apartment to work.)

Back in February of 2004, my husband and I had spent a typical Saturday afternoon in Central Park, and then wandered over to the then-newly constructed Time Warner Center for a smoothy from Jamba Juice. We stopped in Williams-Sonoma to see what was new, and we happened upon a celebrity chef encounter! Sara Moulton was signing copies of her latest book. I immediately used my cell phone to call my mom to see if she wanted a copy. And even though she already had one, I received the go-ahead to purchase another copy and get it autographed for her. Sara Moulton was so friendly, and my husband and I engaged in conversation with her about restaurants in a college town that we had all previously lived in.

This recipe is one of my favorite Sara Moulton recipes, and one that we even discussed with her. It is an excellent entrée if you are looking to please both vegetarians and meat-eaters. Based on my experience, it freezes pretty well too, if you want to make a lot and save some for future lunches or dinners. The black bean spread is so excellent on it’s own, I have made it to put in quesadillas. You could use that part of the recipe for any other dish that needs black bean spread. The cumin and the chili powder work wonderfully with the black beans! Garnish these with your favorite fixings! (I regularly use cheese, salsa, sour cream, and cilantro.)

Sweet Potato and Black Bean Burritos
(From Sara Moulton Cooks at Home, slightly modified)
Ingredients
2 sweet potatoes, about 10 oz. each
2 tablespoons olive oil
cooking spray
1 onion, finely chopped
2 garlic cloves, minced
½ teaspoon cumin
½ teaspoon chili powder
1 (15 oz.) can black beans, rinsed and drained
½ cup vegetable stock
Kosher salt and freshly ground black pepper, to taste
¼ teaspoon ground nutmeg
Ten 6-inch flour tortillas (wheat tortillas will work, too)
2-3 green onions, white part only, thinly sliced
I cup Monterrey Jack cheese, shredded
Optional: Shredded romaine, sour cream, salsa, pickled Jalapenos, grated Cheddar cheese, chopped cilantro, etc.

Directions
Preheat oven to 400°F. Prick potatoes with a knife in several places and bake in a small baking pan until very tender, about 1 to 1 ½ hours.

Meanwhile, heat 2 tablespoons olive oil in a large skillet over medium heat. Add the onion and cook, stirring often, until softened, about 5 minutes. Add the garlic and cook for 1 minute longer. Stir in the cumin and chili powder and cook for 1 minute. Add the beans and vegetable stock, cover, and cook until the beans are very soft and the flavors have blended, about 5 minutes. Use a fork or potato masher to coarsely mash the beans. Season with salt and pepper. You should have about 1 ½ cups.

Remove the potatoes from the oven and cool. (Keep the oven at the same temperature.) When the potatoes are cool enough handle, halve and scoop out the flesh. Place the flesh in a small bowl and use a fork to mash coarse. Discard the skins. Add the nutmeg and season with salt and pepper. You should have 1 ½ to 2 cups.

Spread the tortillas with roughly equal amounts of the bean mixture. Tops with equal amounts of the potato puree. Sprinkle on equal amounts of cheese and green onions. Roll the tortillas into cylinders and arrange, seam side down, on a baking sheet (large enough to hold the burritos in one flat layer). Spray the tops with cooking spray.

For a soft burrito, cover with foil and bake until warmed through, about 20 minutes. Bake uncovered for a crisper burrito. Arrange the garnishes attractively in bowls and let diners garnish their own burritos.

Note: I bake my burritos covered with foil for 15 minutes. I then remove the foil and bake them for another 5 minutes. I then top the burritos with cheddar cheese (or other Mexican or Taco cheese blend), and bake for 1 minute, until cheese melts.


Wednesday, September 16, 2009

Everyday Salad: Kate's Fresh Herb Salad & Lemon Vinaigrette

For the first time in my life, I attempted to grow something this summer. This was a risky bet, as I do not have a green thumb. I have no children, pets, or plants, and therefore, no responsibility to tend to anything other than my husband (and well, if I forget to feed or water him, he’ll let me know!). I thought about growing my own herbs a couple summers ago. My mom informed me that I’d need to water them a couple times a day, so I quickly abandoned that idea. But this summer I decided to give it an attempt. I figured that even if I couldn’t keep them alive for long, I’d at least get my money’s worth in the beginning.

We purchased some basil, mint, chives, Italian parsley, and cilantro from the farmers’ market and planted them in a small planter at home. The total cost was under $10, so after just a couple uses, I had already surpassed what I could have purchased for that amount of money at the grocery store. I’m pleased to say that I’ve been good adequate at remembering to water them. My mint took a little while to get started, but it’s coming in nicely now (and from what others are telling me, it will never go away!). The cilantro has had it, but we had a good run. It has been so convenient and economical to be able to step outside, trim a few leaves, and add fresh homegrown herbs to my dishes.


One evening this summer I was throwing together a salad, and decided to use all of the herbs that I had. I actually just tossed the herbs with some arugula, added a little dressing, and that was it – a delicious, yet simple salad! I started making this salad every night. It is so simple and light. I have so many salad recipes that include lots of cheeses, beans, nuts, dried fruit, etc., which are all quite good, but on a warm summer day, this is refreshing and hits the spot.

In the recipe below, I’ve included pine nuts and Parmigiano-Reggiano to add some texture, but if you’re up for a simplified salad, feel free to omit them. This vinaigrette is my standard dressing that I use on almost all salads. I make a batch and keep it in a mason jar in the refrigerator to last throughout the week. I think the dressing tastes great with just the lemon and the olive oil, but my husband complained that he tasted “too much lemon”, and with the addition of a little honey and Dijon, he likes it very much now! This is a salad that you can get creative with and add your own favorite herbs, cheese, nuts, and/or dried fruits.

Kate's Fresh Herb Salad & Lemon Vinaigrette

Ingredients
For Lemon Vinaigrette:
* 1 lemon (juice and zest)
* ¾ cup extra-virgin olive oil
* ½ teaspoon honey
* ½ teaspoon Dijon mustard
* Kosher salt and freshly ground black pepper, to taste

For Fresh Herb Salad:
* 8 cups loosely packed arugula
* ½ cup fresh herbs (such as basil, cilantro, chives, Italian parsley), coarsely chopped
* 2 green onions, chopped
* ¼ cup Parmigiano-Reggiano, grated
* ¼ pine nuts, toasted

Directions
Zest half of the lemon, and combine with juice from entire lemon, olive oil, mustard, honey, salt, and pepper. Either whisk ingredients together in a small bowl, or combine ingredients in a container with a sealable top (such as a mason jar) and shake until all ingredients are incorporated. (The vinaigrette will keep in the refrigerator for several weeks.)

In a large bowl, toss arugula with green onions, fresh herbs, and a couple tablespoons of dressing, so lettuce is just barely coated. Arrange salad mixture on individual plates, and to garnish, sprinkle each salad with cheese, pine nuts, and freshly ground black pepper, if desired.


Tuesday, September 15, 2009

Sunset Magazine: Miso-Glazed Eggplant

As a way to use up some frequent flyer miles, an airline provided my mother with subscriptions to a variety of different magazines. Lucky for me, she passes them on once she and my father have read them. Last week I was thumbing through her most recent stack and began to read through a magazine I had never seen before, Sunset ("the ultimate Western lifestyle"). The magazine covers food, wine, home, gardening, travel, and traveling for thirteen western states. After realizing the focus of the magazine, I quickly became engrossed. You may have noticed I’ve been posting a lot about our time in California. The past couple years have provided my first -of several- trips to the previously unexplored west coast – and I find it to be a rather fascinating place. Although I have only read one issue of Sunset Magazine to date, I am anticipating that this will become a new favorite read for me.

I read through several recipes in the September issue which I quickly flagged. I took advantage of the ripe eggplant at the farmers’ market last weekend to make their miso-glazed eggplant. This recipe is fairly easy, however it may require some ingredients that you don’t typically keep on hand (such as miso, sesame seeds, and sake). I opted to use white wine instead of sake (per their suggestion), yellow miso, and Italian eggplant (at the market they looked better than the Japanese eggplant). The recipe calls for you to broil the eggplant, however we grilled them on both sides, then coated them with the miso mixture, popped them under the broiler for about 3 minutes to caramelize the glaze. We served this on top of steamed white rice.


Miso-Glazed Eggplant (Nasu Miso)
Submitted by Scott Lorenz, Scotts Valley, CA, Sunset, September 2009
Ingredients
* 3 tablespoons vegetable oil
* 4 Japanese eggplant (about 1 1/2 lbs. total), cut in half lengthwise and flesh scored 1/4 in. deep
* 1/3 cup yellow or red miso*
* 2 tablespoons packed light brown sugar
* 2 tablespoons sake or white wine
* 1/4 teaspoon red chile flakes
* 1/4 cup cilantro leaves
* 1 teaspoon toasted sesame seeds

Preparation
1. Preheat broiler with a rack 4 in. from heat source. Heat oil in an ovenproof frying pan over high heat. Add eggplant, flesh side down, and cook until flesh starts to brown and soften, about 4 minutes.

2. In a small bowl, combine miso, sugar, sake, and chile flakes. Turn eggplant flesh side up and brush mixture over it. Broil eggplant in pan until glaze starts to brown, about 3 minutes. Sprinkle with cilantro and sesame seeds.

*Look for miso, a fermented soybean paste, in the refrigerator aisle of your produce section.